Showing posts with label chocolate castings. Show all posts

Tuesday, August 9, 2016

Ten Most Compatible Casting Materials with ComposiMold

Here are some quick tips for the variety of casting materials you can use in a ComposiMold mold:
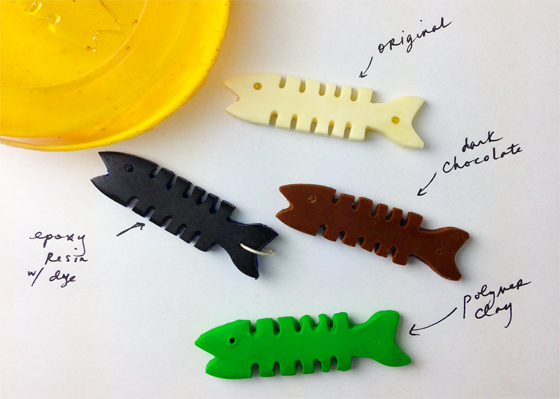
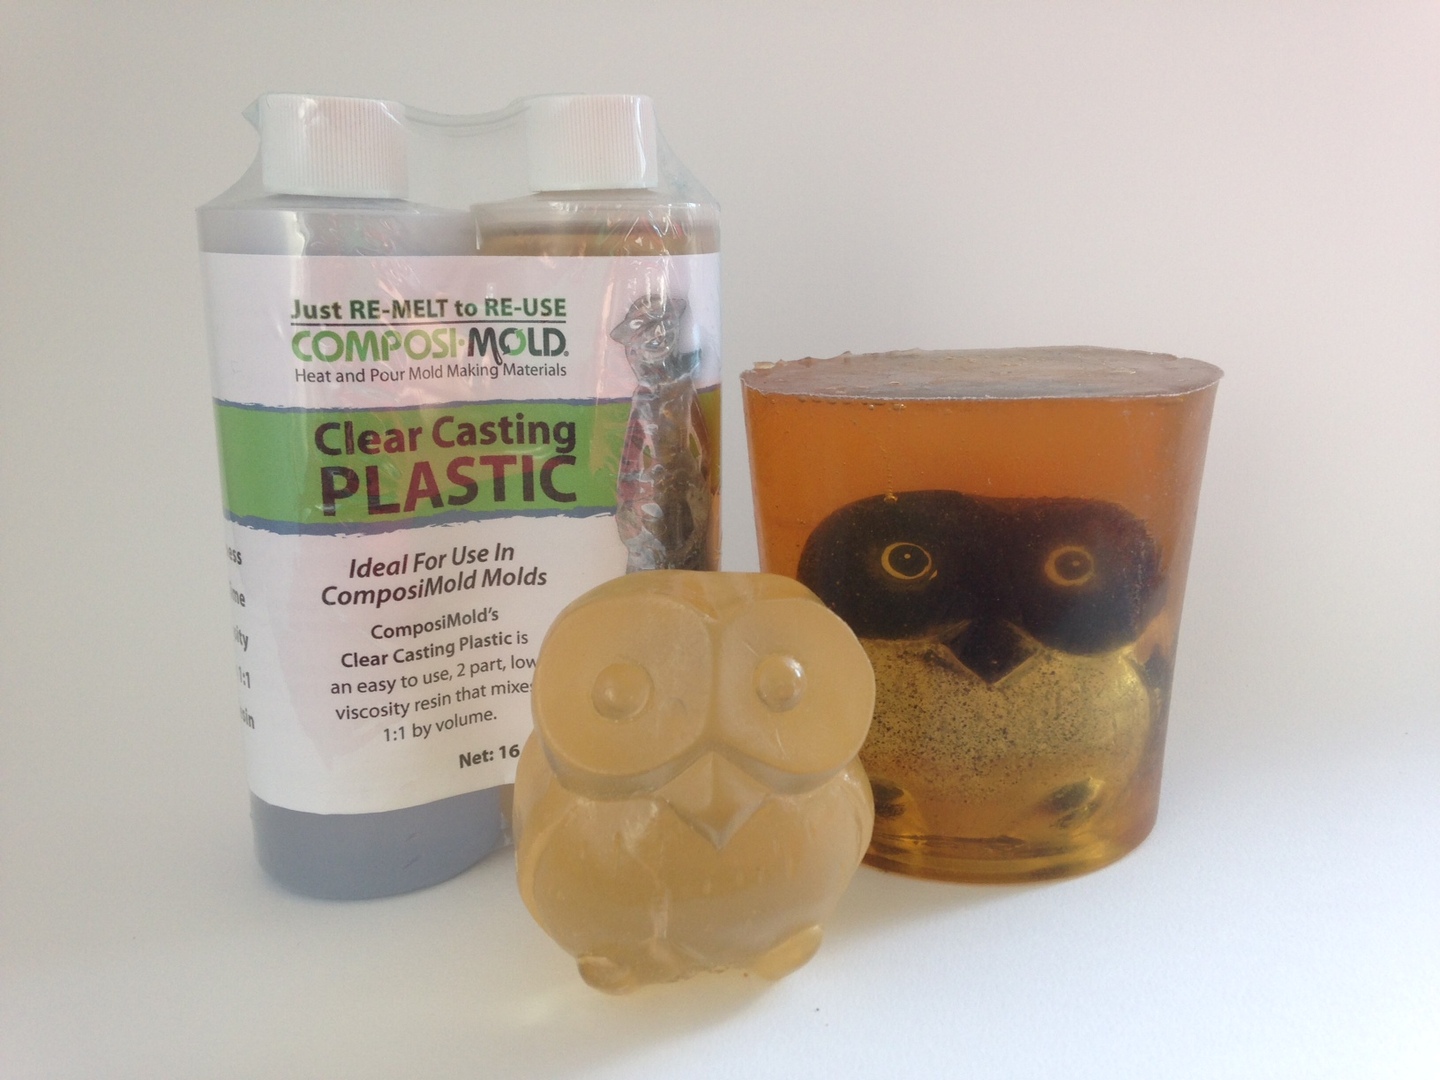
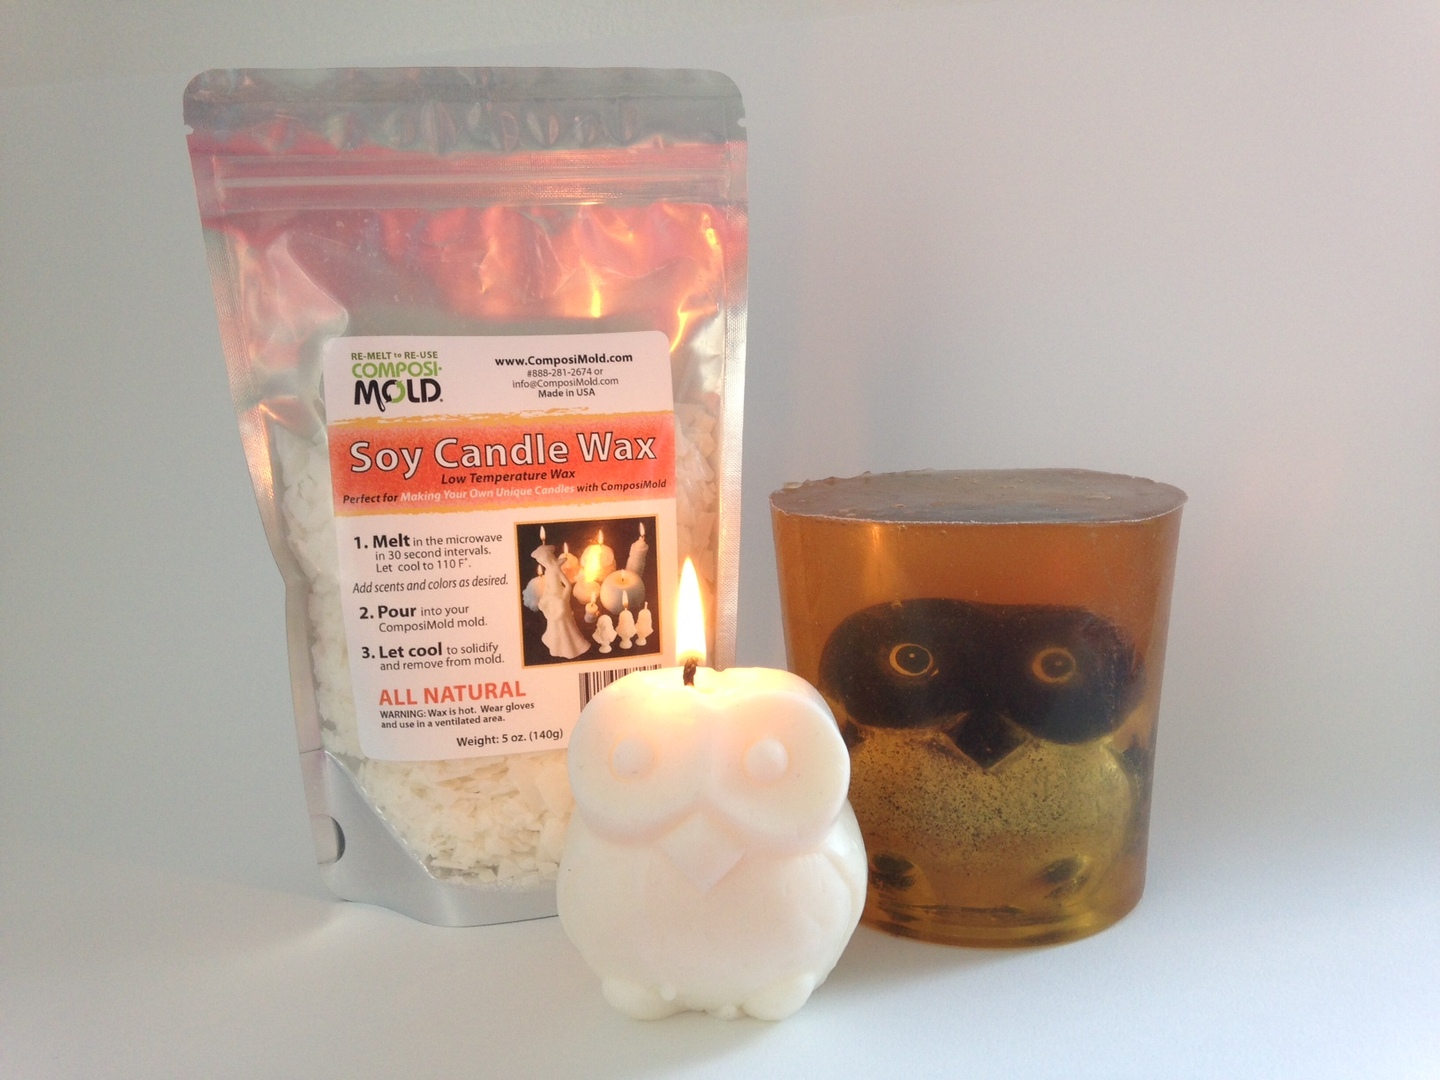
EPOXIES: Epoxy Resins, Putty, or Clay
Epoxies work well for pieces up to 8 cubic inches. For larger castings of 8+ cubic inches, choose epoxies with longer cure times of 24+ hours. Experiment with freezing the mold prior to pouring epoxy resins that create a lot of heat during curing. Epoxy resins that require an added heat source for curing are not recommended.

Try our jewelry grade, crystal clear, Clear Casting Plastic for castings up to 6 cubic inches. Chill the mold for castings up to 20 cubic inches.

URETHANE OR POLYURETHANE:
Choose a urethane with a longer cure time. These create less heat as they cure. You can also experiment with freezing the mold prior to pouring higher temperature urethane resins. Be sure to use talc powder/baby powder as your mold release before each casting made.

SILICONE:
Silicones work great in ComposiMold molds. Make castings with both platinum or tin cured silicone rubbers.

PLASTER/CONCRETE:
Mix plaster and water together in a 72 parts plaster to 28 parts water, by weight, or to a toothpaste-like consistency. Traditional plasters cure well but leave a slight soft layer on the outside of the casting. To avoid this, apply a layer of Plaster Release to the mold before pouring casts. Fast curing masonry cements work great and cure extremely strong. Follow instructions for mixing ratios.

Try our ComposiStone formulation! It’s smooth like plaster but hard as concrete. It works very well in a ComposiMold mold.

SOAPS:
Shea Butter and Glycerine Soap make great soaps! Chill the mold prior to pouring any higher temperature soaps (above 140ºF).

WAXES: (for candle molds or encaustic casting)
Soy, Paraffin, Beeswax, and Melted Crayons work really well. Chill the mold first for higher temperature waxes (above 140ºF).

Try our all natural Soy Candle Wax for candle making and beautiful wax castings. Cools to a white, creamy finish!

CLAYS:
Use any type of polymer clay, modeling clay, putty, or real clay for push molding in a ComposiMold. Do not use clay in a slurry form or the water will degrade the mold.

CHOCOLATE:
Pour or pipe many types of melted chocolate into your mold. Lightly tap or vibrate the mold to release air bubbles in the chocolate. No mold release is necessary for chocolates.

FONDANT:
Press softened fondant into your mold with your hands or a rolling pin and remove immediately. No mold release is necessary for fondant.

When casting edible treats, you can also use: no-rise cookie dough recipes, gummies, gum paste, ice, butter, and more!

...AND MANY MORE:
For your art, craft, hobby, and hardware projects, you can also try: adding fillers and dyes to casting materials, ComposiMold itself as a rubber casting material, Modeling Compounds, Polyester Resin, Paper Mache and many more!

Do you have a question about using a specific casting material that was not answered here? Email or call anytime!


Please share this video and tell everyone you know about ComposiMold! Plus subscribe to see the next amazing blog post from ComposiMold!

Tuesday, June 30, 2015

Olympia Turns a Squinkie into a White Chocolate Ring Pop

What would we do without our most creative mold makers around? Our kids make the coolest things!

Olympia, the founder of ComposiMold's daughter, wanted to make a toy she could actually eat, just like babies chew on their toys. Who wouldn't want that, right?!

She explains the ComposiMold process as well as any of her adult counterparts and turns her little Squinkie toy into white chocolate. By pressing an empty Ring Pop ring into the bottom of the still melted chocolate, she was able to turn her creation into a functional AND EDIBLE work of art!


Please share this video and tell everyone you know about ComposiMold! Plus subscribe to see the next amazing blog post from ComposiMold!

For More Information Visit: 

Thursday, October 25, 2012

ComposiMold-FC First Timer Falls in Love

We always love sharing first timer's experiences with our blog followers. It's educational to read about someone else's trials, errors, and impressive final results. In the following post you will learn how one teacher taught herself to use ComposiMold-Food Contact and now has ComposiMold fever!  


 "Let me start by saying I teach; that's my forte, teaching.  I work with seventh and eighth graders on language arts and social studies. I am no baker.

Baking a cake means opening a Betty Crocker box, adding 3 ingredients, and BAM!  (I do manage a pretty good buttercream frosting on my own however.)  This is the background needed for you to understand my reluctance to try molding unique chocolates with ComposiMold. I procrastinated for a week before I plugged in my country music and pulled out the molding materials.

There were a few trial and error attempts.  First, I did not know that I had to attach the item I wanted to mold to the bottom of my container.  My pumpkin floated to the top as I poured ComposiMold over it.  Lesson learned!  Secondly, and in retrospect an obvious blunder on my part, wood items such as the wooden anchor I used, requires a food safe mold release. Wood is very porous and it took some elbow grease to get it out of my mold.  My anchor came out well without using the coating, but I would apply it in the future.  My only other admission is that I was prone to lapping the chocolate from the spoon once I filled the molds. 

So to my amazement, the entire process is simple and, even better, therapeutic and relaxing.  I totally enjoyed the experience.  Granted I am no artist nor cake decorator nor professional molder.  Yet my results were adequately impressive for having never tried it before.  I created some neat chocolate creations that I put on cakes over the course of the week.  Yes, my peers at school love me—cakes all week in the staff room.

A decision has already been made that everyone I know will be receiving unique chocolates from me for the holidays.  I am thinking of molding soap as well.  ComposiMold has created a monster!  I now go into stores and find myself thinking, “ah, that would be a great item to mold and use on a cake!" My advice to any folks reluctant to try ComposiMold: try it, you'll really enjoy it.”  What is even better is that the molding material is reusable time and time again.  ~Bobbi"


 For More Information visit: www.ComposiMold.com www.Facebook.com/ComposiMold www.YouTube.com/ComposiMold order at www.ComposiTherm.com

Monday, March 5, 2012

Cutting block used to make original ComposiMold-Chocolate Casting


We just made some chocolates for a children's art show. The shape is of a VW Beetle, or the "ArtBug".

We made the chocolate shapes with ComposiMold-FC. The original shape was made with a cutters block used to make stamps. The shape was cut down with carving tools. Looks like a candy bar!

For more information visit:
www.ComposiMold.com
www.youtube.com/composimold
www.Facebook.com.composimold

To order:
www.ComposiTherm.com

Friday, January 20, 2012

The fun you can have with ComposiMold, chocolate, and some creativity

Although I am biased, she makes a pretty cool spokesperson for ComposiMold. Here she is making a chocolate mold and casting with ComposiMold.


www.ComposiMold.com

To order the food contact ComposiMold visit http://compositherm.com/focomomama.html

See more at www.Facebook.com/ComposiMold

Thank you!

Wednesday, October 19, 2011

Halloween Treats You Can't Get at a Store


Instead of Snicker's Bars or random store bought sweets, you may like to make your own unique chocolate shapes with ComposiMold-FC. You make the shape, make a mold out of your shape, and then make chocolate castings. The shapes can range from letters (shown in a previous blog post) or specialized for the Holiday Season. The nice part about ComposiMold-FC is you can make a Halloween Chocolate, followed by a Thanksgiving shaped chocolate, followed the next Holiday Season, followed by the next...By melting the ComposiMold, you can make lots of different shapes with the same ComposiMold.

Here we show the process for making a Halloween Chocolate Pumpkin using a pumpkin magnet. Super easy:

Step 1. Place the magnet into a container, such as tupperware or other plastic container


Step 2. Pour ComposiMold over the shape to make the rubber mold, let cool.

Step 3. Pull out the original shape (the Master)


Step 4. Melt the Chocolate. We used an orange colored chocolate. You can also use white chocolate and add orange food coloring.

Step 5. Spoon the chocolate into the mold. With smaller molds, the squeeze bottles work great.

Step 6. Let the chocolate cool. Place in the refrigerator or freezer to cool faster

Step 7. Peel the ComposiMold away from the chocolate.

Step 8. Make more chocolate castings and then more shapes!

For more information visit:
www.ComposiMold.com

To order the ComposiMold-FC:
http://www.compositherm.com/cooz.html

Wednesday, September 21, 2011

Saturday, August 13, 2011

DIY Wedding-Chocolates, Soaps and Candles Castings Video Demonstration

Talk about a unique wedding! Forget the hershey’s kisses or the wedding bells! Make the special day truly your own with chocolates made specifically for the bride and groom or even better individually for the wedding guests.


To start: Let your imagination go crazy. Imagine finding your seat by looking for your name in chocolate. And then seeing the wedding cake with a special wish for the newly weds-in chocolate. And later in soap or even as candles! Make molds and castings of words, special objects that have real meaning to the bride and groom.

 
Collect the ingredients:
  • Chocolate (white chocolate can be colored with food coloring) milk chocolate, dark chocolate…
  • Containers to make the molds and castings in
  • ComposiMold-FC (food contact safe to make reusable chocolate molds)
  • Microwave
  • Refrigerator
  • Stir stick
  • Food coloring (optional)
  • Lollipop sticks (optional)
  • Vegetable oil (mold release)
  • Bubble Buster (optional-helps reduce bubble formation) 
Start with your object

 Make your master or original design. You will need to make the shape or design of what you want to duplicate in chocolate, candle wax, or soap. Select objects that are relatively uncomplicated. For your first piece, use a very simple shape. We used a heart shape with letters for the bride’s and groom’s name. The letters can be glued down or you can use clay to stick them down. The clay is nice because you can move them around or reuse the letters for other names or designs. You can add extra designs as you become more comfortable with the mold making process.

 
Place your object in a container. Use containers that can handle high temperatures (150 F) Tupperware works well, but aluminum tins can be shaped around your original master, legos (sealed with clay) can be used, or some plastic/paper cups can be used if they can handle hot coffee.

 
Spray your part with mold release. Use a vegetable oil. Also, spray on some bubble buster. This is a diluted solution of PVA and water to reduce bubble formation when you make the mold.

 
Heat and melt the ComposiMold-FC in the microwave. A 6 oz container takes about 30 seconds to a minute depending on the microwave and altitude. Stir the ComposiMold to ensure even temperature distribution.

 
Make the mold by pouring the ComposiMold over the original master. Let cool or stick the mold in the refrigerator or freezer to cool faster.

 
When cooled, take out the original master, flip the part over and pour in melted chocolate.

 
Melting the chocolate can be a little tricky: Chocolate melts well in the microwave, but use short intervals and try to stir after each interval. For example, we use 30 second intervals for about ¼ pound of chocolate, stirred, and put it in for another 30 seconds.

 
You can use lots of different kinds of chocolates.

 
To get into crevices in your mold, a squeeze bottle is useful. This is how we made the chocolates with both white chocolate and milk chocolate shown in the video. The letters were filled first by squeezing the chocolate into the letters with one color and then the rest of the mold filled with a different chocolate.

 
When finished with one chocolate casting, you can remelt the ComposiMold mold and make a different mold.

 
CANDLES and SOAPS: Instead of using chocolate you can use candle wax or soap. However, before pouring candle wax or soap into the ComposiMold, be sure to COOL or FREEZE your ComposiMold mold first so that the hot temperatures of the wax or soap do not melt the ComposiMold. Thicker molds can also help, give at least a ½ inch around the sides and bottom of the mold and an inch would be better.

 
To clean the mold, use a wet paper towel and dry immediately afterwards.

 
Repeat with different objects, letters, shapes. All of the shapes made in the video used the same mold making material. By remelting, lots of different molds can be made.

 
Other ideas to mold and cast in chocolate:

 
  • Chocolate Shot glasses with the names on the side or the date
  • Chocolate wedding rings
  • Lollipops with names of guests
  • Original wedding cake toppings 
What objects do you suggest to mold and cast in chocolate, candle wax, or soap?


 http://www.composimold.com/ or to order your ComposiMold go to http://www.compositherm.com/
 
Thank you and enjoy!

Friday, July 16, 2010

Tips and Tricks for Custom Chocolate Mold Making

And now the latest discussion on chocolate mold making with ComposiMold-FC at:

http://composimold.com/chocolate-mold-making/index.php

Tips and Tricks for Custom Chocolate Mold Making

Chocolate Mold Making Material

So many chocolates molds and chocolates! How do you make truly unique chocolate molds that only you have?


Answer: Make your own custom molds for your chocolate candy making.


The methods discussed here provide ways to make your own molds from objects or other castings. These mold making methods will work for simple pour in molds and complicated 3D chocolate molds (Easter bunny-too easy!) Here are some simple ways of making your own customizable chocolate candy molds.


First, the Chocolate


There are hundreds of different types of chocolates. We can’t help you decide which one you want. You will have to do your own taste tests to see which one you like (I know you are thinking about the sacrifices we must do for our craft). For a good description of the different types of chocolate, check out
Chocolatechunks.com

or about.com.

Most of the larger craft stores have chocolates that can be used for chocolate mold making (and the boring plastic molds that anyone can get). Even your grocery store has chocolates such as the chocolate chips and chocolate bars. This chocolate will work, but may require tempering to provide a shiny surface (A good source for more information on tempering is
about.com/temperingchocolate.


Melting the chocolate


You can melt your chocolate for your molds either in a microwave or using a double boiler (sounds like ComposiMold). In the microwave, place the chocolate in a microwave safe bowl (paper cups are nice) and heat it in 30 second interval. Stir after each interval. If you don’t stir it, it is difficult to see that it is melted because the chocolate does not change shape. Depending on the amount of chocolate you are melting, times will range from 30 seconds to several minutes. I don’t recommend doing more than what you can place in your chocolate molds in 5 minutes.
Using a double boiler is more work, but does melt the chocolate nicely. Heat the water to over 80 degrees F. Put the chocolate in the top container. Make sure that the chocolate does not hit the bottom of the bottom pan and do not mix chocolate and water. Water will ruin the chocolate.


I do not recommend placing the chocolate directly in a pan and turn on the stove because that will likely burn some of the chocolate and probably make a mess.


When the chocolate is melted, but before you put them in your molds is a good time to add any chunks of other foods such as nuts, M&Ms, or hard candies in your chocolate. Just stir the pieces into the melted chocolate.


Making your Customized Chocolate molds


You can buy many different shapes for chocolates, but for something truly unique, you need your own special design, maybe even many special chocolate mold designs. With ComposiMold-FC (Food Contact) mold making material, (ComposiMold-Chocolate Moldmaking), you are able to make as many unique molds as you want.


The mold making material works by melting. It is melted in the microwave (or double boiler) and solidifies by cooling. When you have made all the chocolate casts that you want with one mold, it can be remelted to make other molds.
Start by making or finding the object that you want to make as a chocolate mold. This can be a simple rounded shape or a complicated 3-D shape.


Use a vegetable oil as a mold release.


Chocolate into your Molds


Once the chocolate is melted, pour it into your unique chocolate mold using a spoon, stick, or brush to fill the mold. Tap the bottom and sides to get air bubbles out of the chocolate. This will leave little holes in the chocolate if you don’t.
You may like using a squeeze bottle to push the chocolate into small openings and crevices.

Cool the chocolate in the mold by placing in the refrigerator or freezer.


Peel the mold away from the chocolate as much as possible so you do not put a lot of pressure on the chocolate.


Making many parts for more customized chocolate molds


So you have a unique chocolate mold design that you like and you want to make hundreds of chocolates candies just like it. Doing it one chocolate mold at a time would take quite a while. So there are a couple of ways to make many molds.


The first is to simply take more of your mold making material (www.composimold.com/chocolate-molds and make duplicates of your original part to make more molds.


The second approach is to make many duplicates of your original using a urethane casting material and then molding them all at once. Be sure to use different ComposiMold for the urethane than you do for the chocolate molds. Wash the urethane castings thoroughly before making your chocolate molds with them.


Chocolate Lollipop Molds


After you make your chocolate molds, add a lollipop stick into the chocolate before it hardens. If necessary, secure the stick in the chocolate mold with a little extra chocolate over the stick.


Enjoy your one of a kind custom chocolate molds and chocolate candies

Chocolate Castings made with ComposiMold-FC

To order your ComposiMold-FC (Food contact) for your own customize chocolate molds go to
ComposiMold for Chocolate Molding

View a short pdf tutorial on Chocolate mold making and casting