Chocolate high heels are the new black leather high heels. We'll show you how to use ComposiMold-Flex to make a mold of a decorative heel to then cast in dark chocolate. The ComposiMold-Flex makes it so easy to de-mold your delicate chocolate high heel without breaking it.
https://www.youtube.com/watch?v=i3q90i0VW2o
Amazing on any wedding cake.

Mold Making Discussions Using ComposiMold; an Eco-Friendly, Microwavable, and Reusable Mold-Making Material. www.ComposiMold.com
Showing posts with label chocolate. Show all posts
Showing posts with label chocolate. Show all posts
Tuesday, October 18, 2016
Wednesday, September 7, 2016
Brush On/Pour On Method for Making Molds of Relief Sculptures
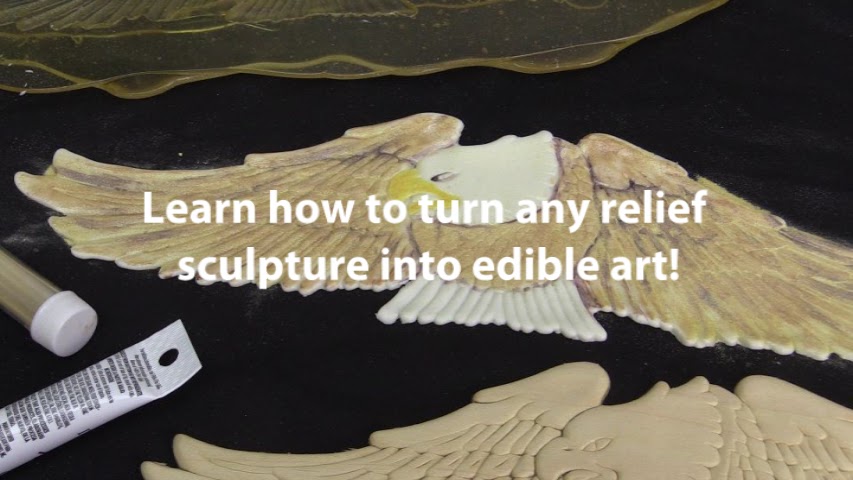
Could making a mold with ComposiMold get any easier?! Why, yes it could. We'll show you how to make a mold of a relief sculpture (flat shape) by just pouring or brushing melted ComposiMold onto it without even using a mold box.
https://youtu.be/JDuXJ9y6Otw
Supplies:
ComposiMold-Food Contact
Fondant
Relief Sculpture
Toothpick
Edible Paints
Instructions:
1. Place your clean relief sculpture on a surface that ComposiMold can easily be peeled away from. In this example we use a piece of glass. (Paper surfaces are not ideal)
2. Melt your ComposiMold-FC in the microwave per the instructions included in the container.
3. Pour a thin layer of CM-FC over the object. Be sure it covers the entire surface including the edges.
4. Look closely for any bubbles that may have been trapped on the surface of your original object. Use a toothpick to pull the bubbles off the surface. You don't need to pop them or try to completely remove them, just be sure they are not touching the surface of the relief sculpture.
5. Let the 1st layer cool until firm to the touch again. A thin layer such as this took less than 20 mins to cool.
6. Pour your next layer over the first. This layer adds firmness and strength to your mold. All the detail was captured in the first layer. Be sure the entire thickness of the mold is at least 1/4" to 1/2".
7. Let this layer cool.
8. Peel the ComposiMold-FC mold off of the original piece and flip it over onto a flat clean surface.
9. Soften the fondant of your choice, roll to 1/8", and transfer to your mold. Press into all the details and edges of the mold.
10. Rub excess fondant away from the edges of the final fondant piece to cut the extra away. (See video)
11. Then gently roll the final edges back towards the final fondant piece to make them neat when the piece is flipped over.
12. Carefully flip the mold and fondant over. Then lift one edge of the mold back and away from the fondant. Slowly bend/peel the mold away from the fondant to reveal your edible creation.
13. Paint and decorate the fondant shape with edible materials. Wrap it around the side of a cake, drape over a cupcake, or showcase it on its own!
14. Make as many fondant creations as you need or pour melted chocolate into your mold to make a different version.
15. Wipe away any fondant or chocolate from the mold with a cold damp cloth, re-melt the ComposiMold, and store covered until your next project.
Here is a link to a video tutorial of the same project: https://youtu.be/JDuXJ9y6Otw
Please share this video and tell everyone you know about ComposiMold! Plus subscribe to see the next amazing blog post from ComposiMold!
For More Information Visit:
Wednesday, October 28, 2015
Which ComposiMold Reusable Mold Making Material Should You Use?
Let's make one thing clear! We do not want to confuse you! Currently, ComposiMold comes in four heat-and-pour varieties and we've just released a putty version too! So which one do you choose when it's time to make your project? It depends on your preferred casting materials or your preferred casting technique. Here's a quick guide to help you find the right material for you!
Casting Materials
Soft Casting Materials ie.chocolate, wax, soap: ComposiMold-Flex
Edible Casting Materials: ComposiMold-FC (All Heat and Pour Materials are food contact safe)
Polymer Clay OR Fondant for push molding: ComposiMold Firm
Plastic, Epoxy, Urethane/Plaster, Concrete, ComposiStone: ComposiMold-Original
Casting Technique
Push Molding: ComposiMold-Firm
If you'd rather use a material that you can press onto your master object, instead of pouring over your master object, choose ReMold Putty. This material works great with higher temperature casting materials and for making molds of objects that cannot be moved to a mold box.
Heat and Pour Mold Making Materials
ComposiMold-Original Not Too Firm, Not Too Soft, Compatible With Dozens of Casting Materials
The original Reusable Mold Making Material. When you are tired of wasting your money on silicone molds, stop worrying and start using ComposiMold, a 100% reusable mold making material that works by melting and pouring. NON TOXIC, MICROWAVEABLE, AND REUSABLE OVER 35 TIMES!
Specially formulated for push molds. ComposiMold-Firm has a Shore A hardness of about 20-25 at room temperature and works great for polymer clay push molds or conventional clay push molds. Some cake artists also prefer the stiffer molding material for fondant push molds.
Designed for those who want a more flexible mold. ComposiMold-Flex is perfect for chocolate, waxes, soaps, and other soft
casting materials. The ComposiMold-Flex allows you to pull the mold
away from the soft casting material without damaging or breaking your
creation.
Reusable Mold Making Putty
ImPRESSive ReMold Mold Putty
Make a Mold by applying Putty Directly to Object Being Molded
Can be applied directly to almost any model, capturing the finest detail and curing within minutes. ImPRESSive Putty can be used to make molds of sculptures, prototypes, candles, picture frames, coins, etc. You can cast wax, clay, low melt plastics, low melt metal, and a variety of resins into Re-Usable Mold Putty. ImPRESSive Putty may be remelted and used over and over. No expensive equipment is necessary. Currently, not available for food contact.
Casting Materials
Soft Casting Materials ie.chocolate, wax, soap: ComposiMold-Flex
Edible Casting Materials: ComposiMold-FC (All Heat and Pour Materials are food contact safe)
Polymer Clay OR Fondant for push molding: ComposiMold Firm
Plastic, Epoxy, Urethane/Plaster, Concrete, ComposiStone: ComposiMold-Original
Casting Technique
Push Molding: ComposiMold-Firm
If you'd rather use a material that you can press onto your master object, instead of pouring over your master object, choose ReMold Putty. This material works great with higher temperature casting materials and for making molds of objects that cannot be moved to a mold box.
ComposiMold-Original Not Too Firm, Not Too Soft, Compatible With Dozens of Casting Materials
The original Reusable Mold Making Material. When you are tired of wasting your money on silicone molds, stop worrying and start using ComposiMold, a 100% reusable mold making material that works by melting and pouring. NON TOXIC, MICROWAVEABLE, AND REUSABLE OVER 35 TIMES!
| |
ComposiMold-FC is specifically made for casting Edible Treats! Now
you can make your own chocolate molds! Think of it as 35 unique molds
for the price of one silicone mold. Remember, it's remeltable and reusable, food contact safe, and perfect for chocolates, fondants, gum paste, and more.
|
| |
| |
Reusable Mold Making Putty
Make a Mold by applying Putty Directly to Object Being Molded
Can be applied directly to almost any model, capturing the finest detail and curing within minutes. ImPRESSive Putty can be used to make molds of sculptures, prototypes, candles, picture frames, coins, etc. You can cast wax, clay, low melt plastics, low melt metal, and a variety of resins into Re-Usable Mold Putty. ImPRESSive Putty may be remelted and used over and over. No expensive equipment is necessary. Currently, not available for food contact.
Please subscribe to see the next blog post from ComposiMold!
For More Information Visit:
Tuesday, September 15, 2015
One-of-a-Kind Chocolate Shapes
Make one-of-a-kind chocolate shapes with EASY MAKE IT Chocolate helps make any occasion just a little bit sweeter
This easy-to-use, flexible mold making material allows you and
to turn almost any object into chocolate or fondant! This new and improved mold
making product is reusable, certified food contact safe, and picks up fine
detail! Its flexibility makes it perfect for de-molding delicate chocolate
shapes.
EASY MAKE IT Chocolate comes in two sizes:
6oz., $17.99
20oz $34.99
Buy Now-Click This Link http://composimoldstore.com/mold-making-material/
To learn more about how to turn your thoughts into creations
through mold making sign-up for this FREE eBook---a molding making success
guide: Follow the link below- http://composimold.com/Ebook.html
ComposiMold mold making materials are reusable. They allow for
continuous mold making without the worry.
What are you going to make today?
Please share this video and tell everyone you know about ComposiMold! Plus subscribe to see the next amazing blog post from ComposiMold!
For More Information Visit:
Tuesday, September 1, 2015
Minnie Mouse Birthday Candle
One of the best features of ComposiMold, Reusable Mold Making Material, is that it is transparent. You can easily see your original object through the mold. If the shape of your part is a little too complicated to pull right out of the mold, you can make some cuts down the side. These are called parting lines and they can be strategically placed to run down the sides or back of your final figurine.
When making your parting lines, be sure to leave a portion of the mold intact so the parts of the mold that have been cut can easily line back up when you are on to making your castings later.
You can see in this video we made of a Minnie Mouse Birthday Candle, that we cut the mold 2 times, thus creating a faux 3 part mold. It's easy to line the cut pieces back together to apply tape. This method makes it super easy to pull the delicate candle out of the mold as soon as the Soy Candle Wax is cooled and complete!
Enjoy!
Please share this video and tell everyone you know about ComposiMold! Plus subscribe to see the next amazing blog post from ComposiMold!
For More Information Visit:
Monday, August 24, 2015
Sofia the First Chocolate Cake Topper Clover Disney
Sofia the First Cake Topper
First secure Clover to the bottom of a plastic cup using hot glue. Melt and pour the ComposiMold until it fills at least a quarter inch above Clovers head. Allow the ComposiMold to cool until it becomes rubber like. Remove the mold from the cup and pull Clover out of the mold.
One of the nice things about ComposiMold is that it is flexible making it easy to removing object from the mold, plus its transparent so if you need the cut the mold you can see were the cuts line up. I chose to cut the mold down the center of clovers tail; the tail is the most fragile part of the mold so cutting down its center will allow me to remove the chocolates easily without the risk of losing the tail.
Next heat and pour the chocolate. Heat the chocolate no hotter than 100 degrees Fahrenheit, add Paraffin wax if you want a nice, glossy finish. Wait for the chocolate to cool, and then remove it from the mold. The chocolates will cool faster if you place the mold in the fridge or freezer.
Now paint! I used gel food coloring but you can also use colored chocolates as your paint or just add food coloring to white chocolate to make your own colored chocolate.
Please share this video and tell everyone you know about ComposiMold! Plus subscribe to see the next amazing blog post from ComposiMold!
For More Information Visit:
Monday, July 6, 2015
Despicable Me Minion Duplicating With ComposiMold.
Today we used concrete to create a Minion garden statue. Several months back, we created a yellow chocolate Minion cake topper for an Ises cake show. I recently found the left over minion mold laying around and decided to use it to create a concrete minion.
Despicable Me Minion Video
Become Part of the ComposiMold Experimentation Club! Enter our video contest, the first 100 entrants with an eligible video uploaded to YouTube will become members of the elite ComposiMold Experimentation Club! Awesome Prizes!
Please share this video and tell everyone you know about ComposiMold! Plus subscribe to see the next amazing blog post from ComposiMold!
For More Information Visit:
Thursday, July 2, 2015
Turn Your Logo into a Chocolate Cake Topper
We turned the Startup and Create logo into a white chocolate cupcake topper! You can do this too by printing out a logo as line art, placing the paper over a piece of polymer clay, and tracing and cutting the logo out of the clay.
We then put the clay logo shape into a heat safe mold box and poured ComposiMold-FC over the top.
Once the ComposiMold-FC cools, you can remove the clay and pour melted chocolate into it. The chocolate hardens fairly quickly and even quicker in the freezer. Simply bend the mold away from the chocolate logo, once the chocolate has hardened, and use the chocolate casting to decorate cakes or cupcakes.
Don't forget, once you are done making your cake toppers in this mold, re-melt the mold to make over 35 different logos with one container of ComposiMold-FC.
Please share this video and tell everyone you know about ComposiMold! Plus subscribe to see the next amazing blog post from ComposiMold!
For More Information Visit:
Wednesday, July 1, 2015
How to Use a Wallpaper Scrap to Make a Fondant Cake Wrap Texture
Easily transfer interesting textures onto the side of your cake with a ComposiMold mold. In this example, we used a scrap piece of textured wall paper to make our mold.

1. Glue the entire back side of the paper to a perfectly flat heat safe mold box. (You can make any shape and depth mold box with tin foil.) Be sure the surface you are resting the mold on is level and perfectly flat.

2. Coat the textured paper and inside of the mold box with Food Contact Safe Mold Release. Wipe away any excess.
3. Melt ComposiMold-FC (food contact) per instructions on the lid. Do not let it boil, as this will introduce too many bubbles.
4. Pour the ComposiMold-FC into your mold box to cover the paper by at least 1/2".

5. Let the mold cool and solidify on the flat surface.
6. Pull the mold away from the tin foil and then remove the wallpaper from the mold.


7. Trim any rough edges of the mold with a clean knife or kitchen scissors.
8. Soften your fondant and press it into the mold. Using a rolling pin eliminates the added heat of your fingers which may warp your fondant casting.

9. Trim the edges of your fondant cake wrap and apply to the cake.
10. You can also pick up details in the mold to decorate the top and sides of the cake.

The possibilities are endless. You can find textures to mold everywhere you look. If you are not able to put the texture you want to duplicate into a mold box due to it's location, you can use a different method called: the Brush On Method. This allows you to brush melted ComposiMold onto a texture in place. One example is an instance where we wanted to duplicate a flower detail on the back of a lawn chair. After washing the plastic chair with soap and hot water we followed the steps to create a mold with this technique. Then we were able to make white chocolate castings in this mold. See how the possibilities are endless?!
 |
| White chocolate flower made in a mold of a detail on a lawn chair. The Brush On Method was used here. |
Please share this video and tell everyone you know about ComposiMold-FC! Plus subscribe to see the next amazing blog post from ComposiMold!
Tuesday, June 30, 2015
Olympia Turns a Squinkie into a White Chocolate Ring Pop
What would we do without our most creative mold makers around? Our kids make the coolest things!
Olympia, the founder of ComposiMold's daughter, wanted to make a toy she could actually eat, just like babies chew on their toys. Who wouldn't want that, right?!
She explains the ComposiMold process as well as any of her adult counterparts and turns her little Squinkie toy into white chocolate. By pressing an empty Ring Pop ring into the bottom of the still melted chocolate, she was able to turn her creation into a functional AND EDIBLE work of art!
For More Information Visit:
Olympia, the founder of ComposiMold's daughter, wanted to make a toy she could actually eat, just like babies chew on their toys. Who wouldn't want that, right?!
She explains the ComposiMold process as well as any of her adult counterparts and turns her little Squinkie toy into white chocolate. By pressing an empty Ring Pop ring into the bottom of the still melted chocolate, she was able to turn her creation into a functional AND EDIBLE work of art!
Please share this video and tell everyone you know about ComposiMold! Plus subscribe to see the next amazing blog post from ComposiMold!
Thursday, June 18, 2015
ComposiMold-Food Contact, Perfect for Unique Chocolate and Fondant Shapes
ComposiMold-FC is a
100% reusable mold making material for chocolate, fondants, gum paste
castings, and more. It's a flexible, rubbery, mold making material that
works by melting and pouring. Many casts can be made using the same
mold. ComposiMold-FC is good for the mold maker and confectionery artist
because it can be reused to make different molds without worrying about
wasting mold making material.
You can see we used milk chocolate as our casting material first and then we pressed purple fondant into it next. You can keep making castings until you have as many as you need.
Once you are finished with this mold, simply remelt the material and pour it over your next object. The possibilities are endless when it comes to custom cake decorating, sweet party favors, and one-of-a-kind edible gifts!
ComposiMold-Food Contact Video!
ComposiMold-FC is what we are demonstrating in today's video. We've placed a big stamp that you can buy in a craft store into a tin foil "mold box", coated it with Food Contact Safe Mold Release, and poured our melted ComposiMold-FC to cover the stamp. After the mold making material cooled and solidified, we removed the stamp, and looked at the awesome detail we picked up!You can see we used milk chocolate as our casting material first and then we pressed purple fondant into it next. You can keep making castings until you have as many as you need.
Once you are finished with this mold, simply remelt the material and pour it over your next object. The possibilities are endless when it comes to custom cake decorating, sweet party favors, and one-of-a-kind edible gifts!
Please share this video and tell everyone you know about ComposiMold! Plus subscribe to see the next amazing blog post from ComposiMold!
For More Information Visit:
Wednesday, June 10, 2015
In today's video we feature a mold made of a toy dump truck that we then turned into a Chocolate cake topper. The truck looked like a character from the movie Cars, but when searching online I couldn’t find it in any of the Cars characters lists. Do you know who/what we molded?
Please share this video and tell everyone you know about ComposiMold! Plus subscribe to see the next amazing blog post from ComposiMold!
For More Information Visit:
Subscribe to:
Posts (Atom)